- A western blot is a laboratory method used to detect specific protein molecules from among a mixture of proteins. This mixture can include all of the proteins associated with a particular tissue or cell type.
- A mixture of proteins is separated based on molecular weight, and thus by type, through gel electrophoresis
- Western blotting, the transfer of proteins to a solid-phase membrane support followed by immunodetection, is a powerful and popular technique for the visualization and identification of proteins.
- Western blotting combines the resolution of gel electrophoresis with the specificity of immunoassays, allowing individual proteins in mixtures to be identified and analyzed.
- The western blotting workflow involves two phases: protein transfer to a membrane and detection of the membrane-immobilized protein.
Protein Electrophoresis (SDS-PAGE)
SDS-PAGE (for Sodium Dodecyl Sulfate Polyacrylamide Gel Electrophoresis).
Polyacrylamide gel electrophoresis (PAGE) is a technique to separate biological macromolecules, usually proteins or nucleic acids, according to their electrophoretic mobility.
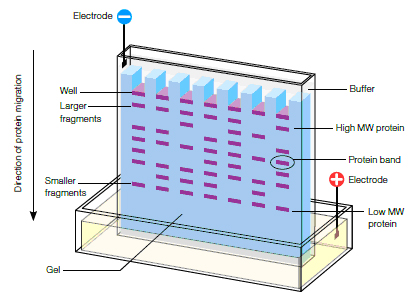
Mr (Molecular weight)
Recommended acrylamide concentration for protein target within defined size ranges.
Polyacrylamide is used to separate most proteins, ranging in molecular weight from Mr >5000 to <200,000.
| Target protein size range (Mr) | Recommended acrylamide concentration |
|---|---|
| 36 000 to 205 000 | 5% |
| 24 000 to 205 000 | 7.5% |
| 14 000 to 205 000 | 10% |
| 14 000 to 66 000 | 12.5% |
| 14 000 to 45 000 | 15% |
the average amino acid has a molecular mass of 100 Da,
ATP synthase (MW≈500-600 kDa)
beta-actin has a molecular weight of 42 kDa,
10% Acrylamide Gels for SDS-PAGE
Resolving gel master mix
- 400 ml H2O
- 250 ml 1.5 M Tris pH 8.8
- 10 ml 10% SDS
Stacking gel master mix
- 340 ml H2O
- 62.5 ml 1.0 M Tris pH 6.8
- 5 ml 10%
SDS Pouring resolving gel
- Make 6 ml of resolving gel (makes 1 gel, with a little bit leftover), 3.96 ml of resolving gel master mix, 1.98 ml of 30% acrylamide, 60 μl of 10% APS, 2.4 μl of TEMED
- Immediately load gel mixture into the casing with a pipette – fill to the line on the casing. Add EtOH on top of gel. Save any leftover mixture to help you determine when the gel is set. It should take about 30 minutes to polymerize at room temperature. To speed up polymerization, you can add more APS and TEMED to the mixture. You can also degas the solution under a vacuum for about 10 minutes before adding the APS and TEMED.
- Once resolving gel is set, pour off EtOH. Rinse with DI water. The gel can be stored for later use (store at 4 °C in 1x Tris Glycine buffer) or can be used immediately.
Pouring stacking gel
- Using a paper towel, dry the inside of the casing as well as possible. Try not to disturb the top of the resolving gel.
- Make 3 ml of stacking gel (makes stacker for 1 gel). 2.51 ml of stacking gel master mix 0.5 ml of 30% acrylamide 30 μl of 10% APS 3 μl of TEMED
- Make sure you have gel comb ready.
- Load stacking solution onto the top of the resolving gel. It takes about 2 mls of solution to fill the gel casing. Make sure there are no air bubbles. Insert gel comb carefully (sometimes the solution will squirt out!). Save any leftover mixture to help you determine when the gel is set. It should take about 10-15 minutes to polymerize at room temperature. To speed up polymerization, you can degas the solution under vacuum for about 10 minutes before adding the APS and TEMED.
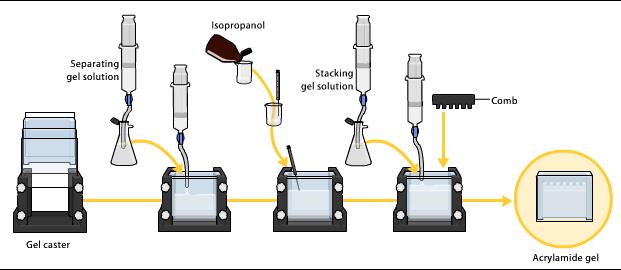
- SDS-PAGE Preparation: https://www.youtube.com/watch?v=EO5hm3eCl50
- How to make an SDS-PAGE gel: https://www.youtube.com/watch?v=in4i78hJDZY
- SDS-PAGE Preparation multiple: https://www.youtube.com/watch?v=in4i78hJDZY
1. Preparation of sample


- Place the cell culture dish in ice and wash the cells with ice-cold PBS.
- Drain the PBS, then add ice-cold lysis buffer (1 ml per 107 cells/100 mm2 dish/150 cm2 flask; 0.5ml per 5x10⁶ cells/60 mm2 dish/75 cm2 flask).
- Scrape adherent cells off the dish using a cold plastic cell scraper, then gently transfer the cell suspension into a pre-cooled micro centrifuge tube.
- Maintain constant agitation for 30 minutes at 4°C.
- Spin at 16,000 x g for 20 minutes in a 4°C pre-cooled micro centrifuge.
- Gently remove the tubes from the micro centrifuge and place on ice. Transfer the supernatant to a fresh tube kept on ice, and discard the pellet.
- How to use pipette: https://www.youtube.com/watch?v=uEy_NGDfo_8
- Tissue Culture and Preparation of Lysates:
2. Electrophoresis
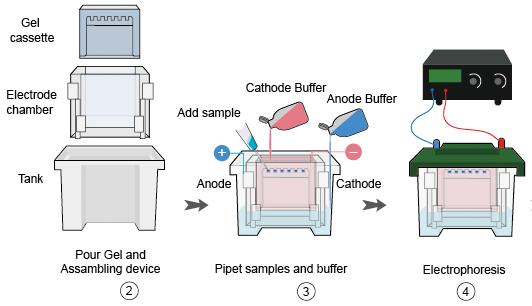
Loading Control
| Loading Control Sample Type | Molecular | Weight (kDa) | Caution |
|---|---|---|---|
| Beta Actin | Whole cell /cytoplasmic | 43 | Not suitable for skeletal muscle samples. Changes in cell-growth conditions and interactions with extracellular matrix components may alter actin protein synthesis. |
| GAPDH | Whole cell /cytoplasmic | 30-40 | Some physiological factors, such as hypoxia and diabetes, increase GAPDH expression in certain cell types. |
| Tubulin | Whole cell /cytoplasmic | 55 | Tubulin expression may vary according to resistance to antimicrobial and antimitotic drugs. |
| VDCA1/Porin | Mitochondrial | 31 | |
| COXIV | Mitochondrial | 16 | Many proteins run at the same 16 kDa size as COXIV. |
| Lamin B1 | Nuclear | 66 | Not suitable for samples where the nuclear envelope is removed. |
| TATA binding protein TBP | Nuclear | 38 | Not suitable for samples where DNA is removed. |
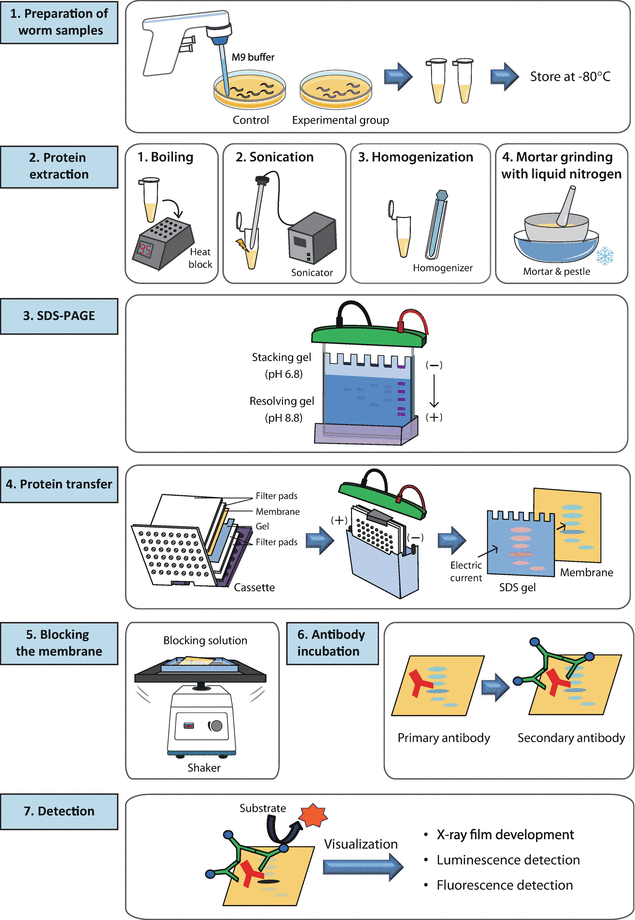
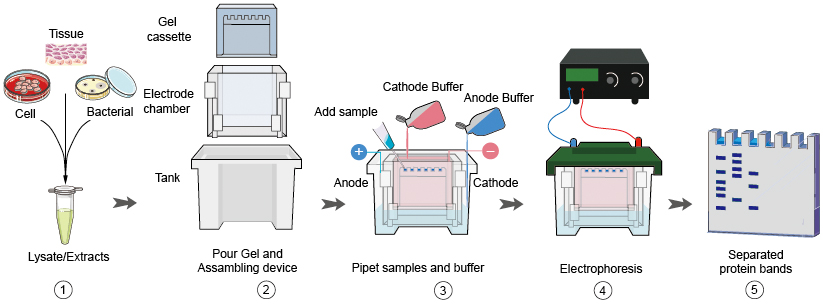
3. Protein transfer
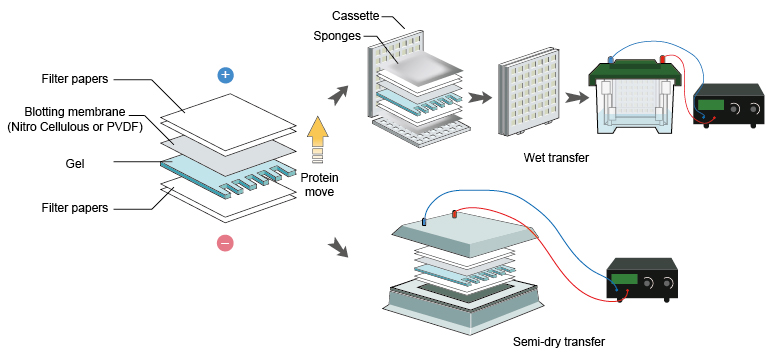
Prepare PVDF membranes for protein transfer ‘Sandwich’
Basic Procedure:
- Note that the PVDF membrane is supplied between two pieces of pre-cut 3 MM filter paper.
- The filter paper may be used as part of the blot ‘sandwich’.
- All washes are performed in a shallow dish with constant shaking.
- Wet the PVDF membrane in 100% alcohol (methanol, ethanol, or isopropanol).
- Drain and equilibrate the membrane and filter paper for 5 minutes in the desired transfer buffer.
- Assemble the blot ‘sandwich’ according to the instructions provided by the manufacturer of your blot apparatus and transfer.
- After transfer, rinse the PVDF membrane with water and proceed to immunoblotting.
Wet transfer
- Cut away the stacking gel and cut one corner from the resolving gel so that enable you to correctly orientate the gel if it “flips over” during equilibration.
- Pre-wet and equilibrate the membrane in transfer buffer.
- PVDF membranes need to be pre-wetted in methanol and water before equilibration in transfer buffer.
- Always wear gloves when handling membranes to avoid fingerprints which will negatively affect the results.
- Pre-wet a sponge and place it on the submerged part of the cassette. Press gently to expel all air bubbles. Place two pre-wetted blotting papers on to the sponge. Place the membrane on top of the blotting papers. Place the gel on top of the membrane. Place two additional pre-wetted blotting papers on the gel. Gently pressing to remove air bubbles. Finally place a pre-wetted sponge on top of the stack and close the cassette.
- Place the cassette in the transfer tank. Watch out the orientation. The membrane should be closest to the anode (+) as the protein with negative charge would move towards the anode.
- Connect the transfer tank to the power supply and transfer according to the recommendations of the manufacturer. (Transfer condition: 30V overnight transfer or 100V for 1h transfer)
Protein transfer: https://www.youtube.com/watch?v=deOvTCXIi1A
4. Antibody Incubation and Gel Visualization
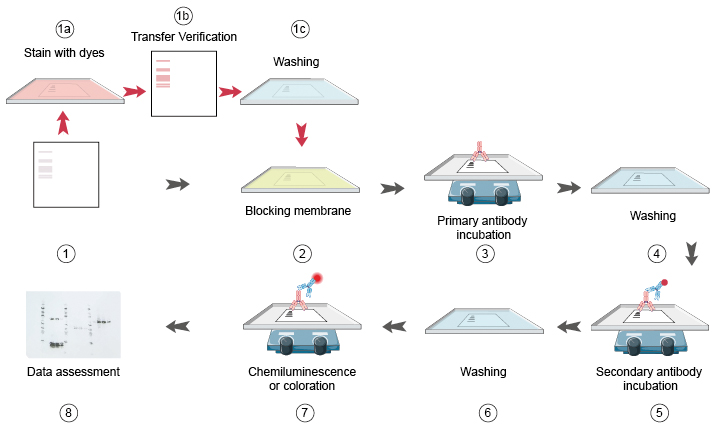
Membrane Blocking
- Remove the blotted membrane from the transfer apparatus and immediately place in blocking buffer consisting of 5% nonfat dry milk/TBS-T**.
- Incubate the blot for 1 hour at room temperature, or overnight at 4°C with agitation.
Antibody Incubation
Dilute the primary antibody to the recommended concentration/dilution in 5% nonfat dry milk/TBS-T. Place the membrane in the primary antibody solution and incubate for 2 hours at room temperature, or overnight at 4°C with agitation. Wash three times for 5 minutes each with Wash Buffer (TBS containing 0.1% Tween-20). 3. Incubate the membrane for 30 minutes at room temperature with horseradish peroxidase (HRP)- conjugated secondary antibody, diluted to 1:1000 - 1:5000 in 5% nonfat dry milk/ TBS-T. 4. Wash 4 times for 10 minutes each with TBS containing 0.1% Tween-20 and once for 2 minutes with PBS.
Protein Detection
1.Incubate membrane (protein side up) with 10ml of ECL (enhanced chemiluminescence substrate) for 1-2 minutes. The final volume required is 0.125ml/cm2. 2. Drain off the excess detection reagent, wrap up the blots, and gently smooth out any air bubbles. 3. Place the wrapped blots, protein side up, in an X-ray film cassette and expose to x-ray film. Exposures can vary from 5 seconds to 60 minutes.
- Probe the Western blot for your target proteins using primary and secondary antibodies: https://www.youtube.com/watch?v=PT1K-09Ny28
- Detect your target proteins using chemiluminescent Western blot substrates: https://www.youtube.com/watch?v=7ezhFmyhc-g
Western Blotting
- https://www.youtube.com/watch?v=VgAuZ6dBOfs
- https://www.youtube.com/watch?v=u7VwmJw9Gbc
- Seperate proteins (loading samples): https://www.youtube.com/watch?v=xhY9LFY_CRs
- Gel loading practice: https://www.youtube.com/watch?v=oqDBPUozDnk
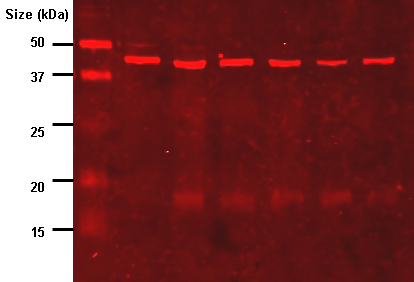
Flair: Science
Collection: Biology Crash Course
